|
Martin JRM-3 Mars
build log |
|||||||||||||||||||||||||||||||||||||||||||||||
|
|
go to..... |
 |
|||||||||||||||||||||||||||||||||||||||||||||
|
|
|||||||||||||||||||||||||||||||||||||||||||||||
 |
 The original Mars with the twin tail was used by the US Navy and first flown in July 1942. Today the only remaining two of these aircraft are being used for aerial fire fighting by Coulson Tankers in Port Alberni, British Columbia. |
||||||||||||||||||||||||||||||||||||||||||||||
|
|
|||||||||||||||||||||||||||||||||||||||||||||||
|
April 2009.....follow
along with me..... |
|||||||||||||||||||||||||||||||||||||||||||||||

Only a few days work here.....it
frames up very quickly and is starting to look like it should
already. The power system..... |
|||||||||||||||||||||||||||||||||||||||||||||||
 |
 |
||||||||||||||||||||||||||||||||||||||||||||||
|
Is that a cool looking prop or
what!! It's a four-blade 9.5" dia. with adjustable pitch. Cost
was only $US17.00 from Hobby Lobby. They come painted with waterslide
decals. We will eventually need four of these..... Choice of power; I made up my mind that I would use brushless motors for power instead of the commonly used brushed motors with gearboxes. I expect this setup to be lighter, more powerful, and at least as cheap as brushed motors. I don’t know of anyone who has installed brushless with four four-bladed props so I have no data on it at all. I will rely on my good friends in the club to advise me on this. The first trials seem to be exceptionally promising.....I have tested a single motor and here are the results;
Motor: Turnegy
28-30 brushless, 750KV, 245W US$14.30 from
Hobby City
There is a Mars in my club that flies very nicely on brushed motors and I
know that the four props turn 5500rpm. Based on this I can see that a
number of the above combinations will fly the plane as good. From here I
will purchase the other three motors and set all four up on a test board.
I will also make thrust comparisons with various combinations to determine
the best capacity and weight of battery. |
|||||||||||||||||||||||||||||||||||||||||||||||
 |
Here are the four motors on the test bench with battery and speed controllers hooked up. They are running fine on a 4400mah three-cell lipo pack .....getting about 5000rpm with this combination which is about what we expected. The Mars should fly fine according to calculations. I mixed rudder to throttle with my Stylus and the right hand and left hand motors are on separate channels. I will now be able to switch this mix on to taxi on the water by having the motors on one side speed up when I apply rudder. I can switch it off when in the air. Now the motors can be installed in the wing and the covering completed. | ||||||||||||||||||||||||||||||||||||||||||||||
|
Here are the final statistics.....
AU Weight 8.5 lbs (approx)
< wow look at this
weight!!
The 18amp. speed controllers were programmed as follows; Layout;
|
|||||||||||||||||||||||||||||||||||||||||||||||
|
|
|||||||||||||||||||||||||||||||||||||||||||||||
 |
 |
||||||||||||||||||||||||||||||||||||||||||||||
 |
 |
||||||||||||||||||||||||||||||||||||||||||||||
|
Here comes the
canopy....after some experimenting I decided it would be useful to vacum
form it from sheet PETG (plastic). A flying friend graciously loaned me
his forming box and after a couple of failures I had the basic canopy. I
made the windshield mould of balsa covered with 3/4 oz. glasscloth,
painted with high solids primer and sanded smooth. After vacum forming
the canopy was masked off and painted white to form the window frames.
|
|||||||||||||||||||||||||||||||||||||||||||||||
|
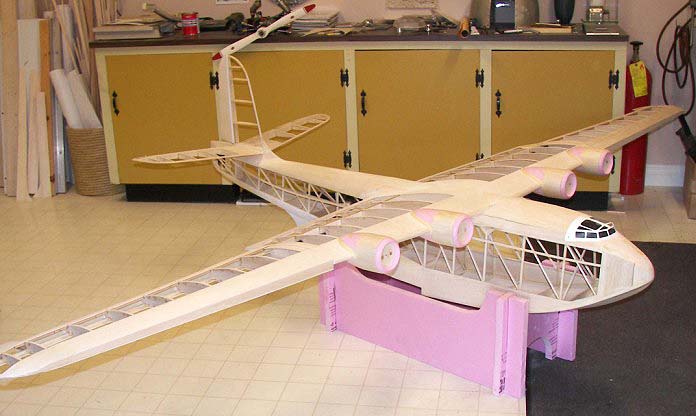
The three-piece wing is
huge and still very light at this stage. The engine pods are being built up
of balsa and foam .....they will be covered with light glasscloth and
clear water-based urethane so that there will be a consistent texture for
the covering. The four motors will mount on the firewall and a secondary
engine
cowling with the cooling flaps will sit another three inches foreword. |
|||||||||||||||||||||||||||||||||||||||||||||||
|
July 2009.....After three months here's what it looks like......almost ready for covering. Amazingly, at this stage it weighs only 3lbs. 7oz. !!
|
|||||||||||||||||||||||||||||||||||||||||||||||
|
|
|||||||||||||||||||||||||||||||||||||||||||||||
|
|
 |
||||||||||||||||||||||||||||||||||||||||||||||
|
Now a coat of high solids primer to fill the weave in the cloth and paint with latex.....the pleasing result is a smooth, shiny finish with no grain showing.....and very light to boot. The decals are waterslide copied from the Timber West website and printed with my computer. |
|||||||||||||||||||||||||||||||||||||||||||||||
|
The engine nacelles are next.....first a drawing, then a wooden plug which was turned on the lathe. Finally a plaster mould. The four engine cowlings will be laid up with polyester resin into the plaster mould. They will go in front of the four engine pods pictured above and the engines will go underneath them. . |
|
||||||||||||||||||||||||||||||||||||||||||||||
 |
The little air scoops that go on the top of the engine cowlings have been cast in resin..... 1. the original
wooden plug made from balsa and
painted. . |
||||||||||||||||||||||||||||||||||||||||||||||
 |
 |
||||||||||||||||||||||||||||||||||||||||||||||
 |
 |
||||||||||||||||||||||||||||||||||||||||||||||
| The nacells were first framed up with balsa and the curved parts carved from pink foam. The entire surface was then covered with glasscloth and water based urethane. After priming with a high-solids primer and sanding they were sprayed with white latex and the trim colors also painted. The engines are stick-mounted. Finlly the painted cowls were added. Next the wiring will be done and the top of the wing will be covered. | |||||||||||||||||||||||||||||||||||||||||||||||
|
|
|||||||||||||||||||||||||||||||||||||||||||||||
|
September 2009.....
Covering is a white Monokote-type film covering from Hobby City at a very
attractive price.....$26.00 for a ten meter roll. The red is One-Shot
enamel masked to give me the striping. The paint is extremely dense (hence
the name) and two light coats covered really well. It is just as glossy as
the white film and it sticks to the film covering well without any
scuffing or other prep......just cleaning with acetone. |
|||||||||||||||||||||||||||||||||||||||||||||||
|
|
|
||||||||||||||||||||||||||||||||||||||||||||||
|
The various logos were printed on waterslide decal paper and stuck onto the film. The decals are clearcoated so that they will not wash off in water. PHILIPPINE
MARS
|
|||||||||||||||||||||||||||||||||||||||||||||||
|
|
|||||||||||||||||||||||||||||||||||||||||||||||
|
Finally, the
small details such as windshield wipers, antennas and peto tubes are added |
|||||||||||||||||||||||||||||||||||||||||||||||
|
|
|||||||||||||||||||||||||||||||||||||||||||||||
|
|
 |
||||||||||||||||||||||||||||||||||||||||||||||
|
I placed the receiver
in a box in the underside of the wing to reduce the number of plugs and to
keep the wiring neat.....to attach the wing I only need to plug in the
main power supply and the tailfeather servos and I am done. I will put a
waterproof cover over the box with the wires going through rubber grommets
to completely waterproof the electrics. |
The 5000mah litheum
pack slides into a lightply box at the extreme front of the fuse to
balance the CG.
I drilled a lot of holes in the box for ventilation. |
||||||||||||||||||||||||||||||||||||||||||||||
|
|
|||||||||||||||||||||||||||||||||||||||||||||||
|
November 2009.....Seven
months from the start it is finished .....and in 2012 here is the Hawaii and the Phillipine together with the model builders and the pilot of the real Water bombers......The pilot tells us that the Phillipine is scheduled to be refitted, repainted navy blue and will spend it's last days in the Pensicola, Florida Navy Museum.
|
|||||||||||||||||||||||||||||||||||||||||||||||
|
|
|||||||||||||||||||||||||||||||||||||||||||||||
|
|
|||||||||||||||||||||||||||||||||||||||||||||||